Workbench #4: Photo Essay

Wow!  It’s been a year since my last post.  Home remodelling has been keeping me busy.  I have mostly completed my workbench, but never got around to posting about it.  Here is a photo essay showing the remaining construction.  I have yet to drill out the dog holes or put leather on the vise faces, but it’s at least basically functional for now 🙂

Legs

DSC_0514

Chamfer on bottoms of legs

DSC_0513

Short rails marked for wedges

DSC_0515

DSC_0516

Drilling relief holes for wedges

DSC_0517

Rounded over edges of rails

Corner Rounding Plane

Cutting wedges

DSC_0518

Preparing to glue up end assemblies

DSC_0520

DSC_0521

Trimmed flush

DSC_0522

DSC_0524

Base assembly fit for knock-down hardware

DSC_0525

DSC_0526

DSC_0527

Hardware installed

DSC_0528

DSC_0529

DSC_0530

DSC_0532

Adjustable feet

DSC_0533

DSC_0534

DSC_0535

Top attached

DSC_0537

Gluing up vise jaws

DSC_0538

Ready for vise installation

DSC_0539

I don’t remember if I got any pictures of the vise installation.  I’ll check and include them in the next post if I have any.

Weekend shop time

I had some unexpected time in the shop this weekend.  I had planned to be working on the stone veneer that we are doing for the fireplace surround in the room that we’re currently renovating.  I am at the point now where some of the stones have to be cut, which from what I understand makes a huge mess.  So I wanted to do the cutting outside — well the rain put a damper on that.

Instead, I got some time in the shop.  I was able to make a quick sawhorse to cut the stone on (if it ever stops raining), put together a crosscut sled for the table saw, and finish up the tenons for the second leg assembly for my workbench.

Sawhorse:


Crosscut sled:


Dry fit of leg assemblies:

Workbench #3 – Leg assemblies

Last time, I had finished assembly of the benchtop but had neglected to get any pictures of it right-side up. I moved it onto the bed in the spare bedroom near my work area to make room for sizing up the leg stock.


I purchased poplar for the base of the bench since it is relatively inexpensive. I read something recently about poplar not being a good choice for a workbench base (not sure what the reasoning was), but I have already purchased it and done much of the sizing of parts from it. I’ll see how it works and can always replace it later if there is some issue with it. It has to be better than not having a bench at all!

Here are the two boards that I milled up the leg stock from:


To make the legs square, I ripped the stock to twice it’s thickness and crosscut to length to get 8 pieces. Gluing pairs of these pieces face to face gave me the four legs:


With some careful alignment during the glue-up, all that was needed was to scrape off the glue squeeze-out and some light card scraping of the joints to finish up the four legs:


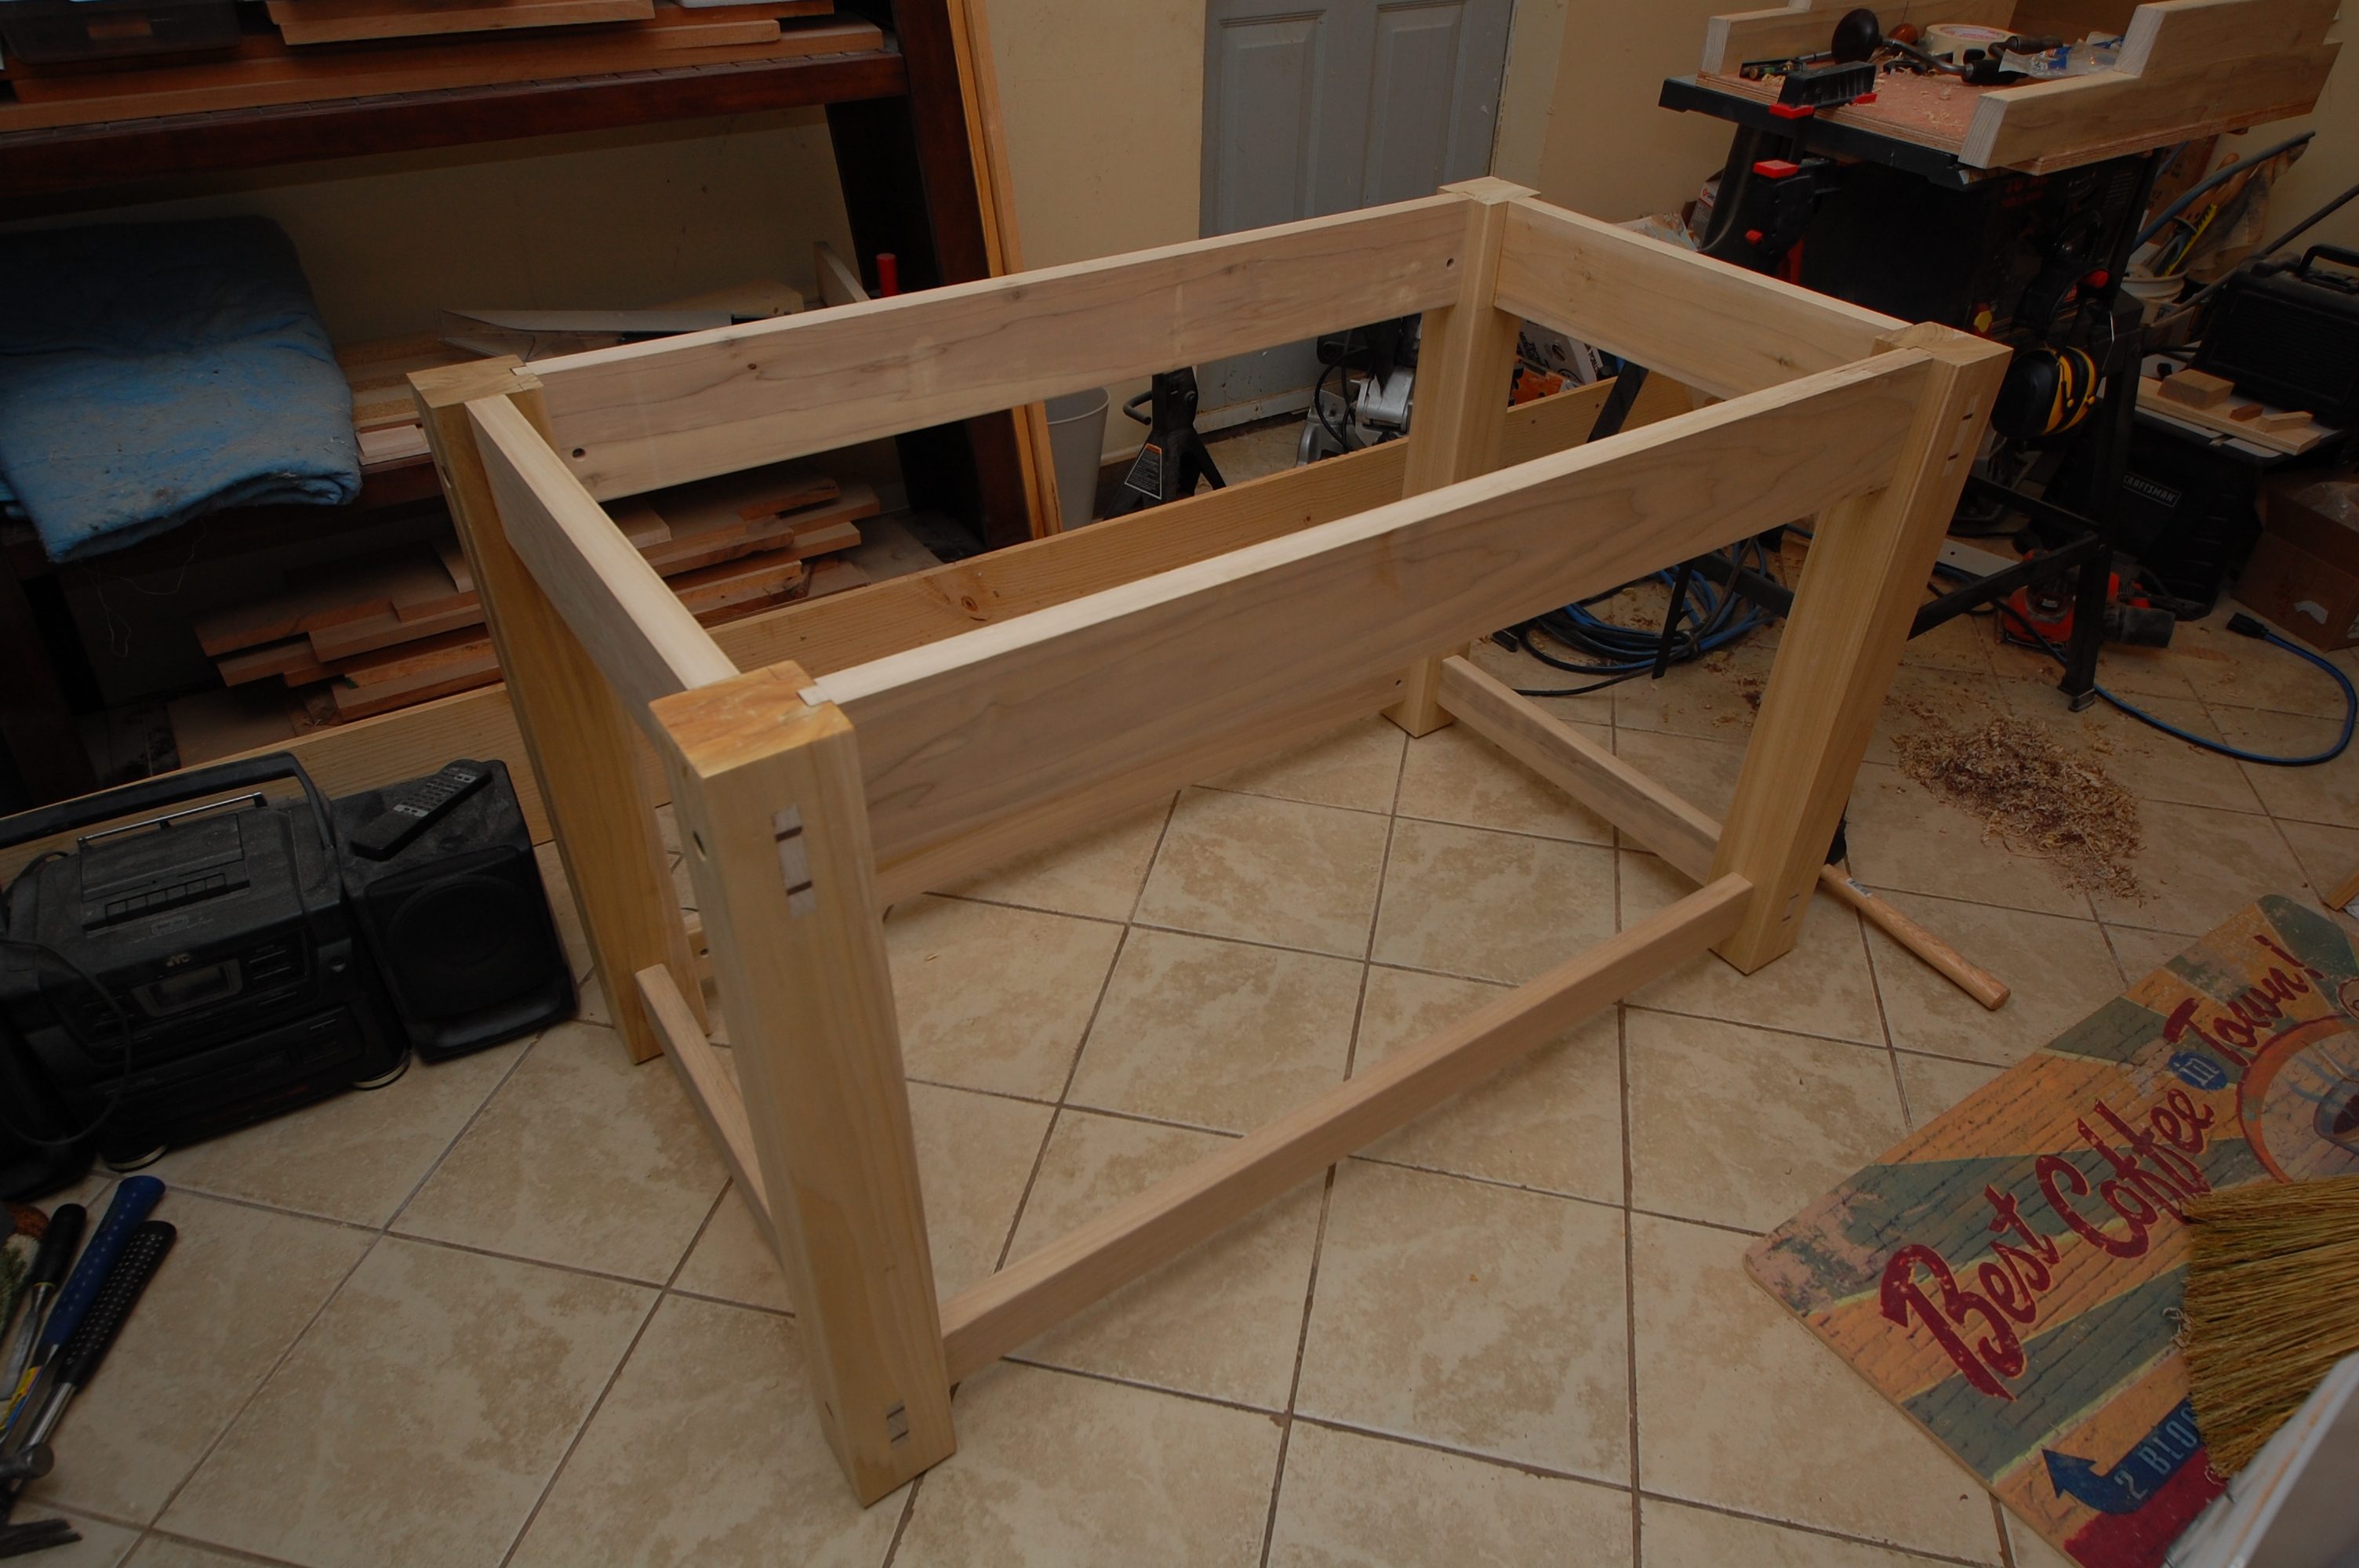
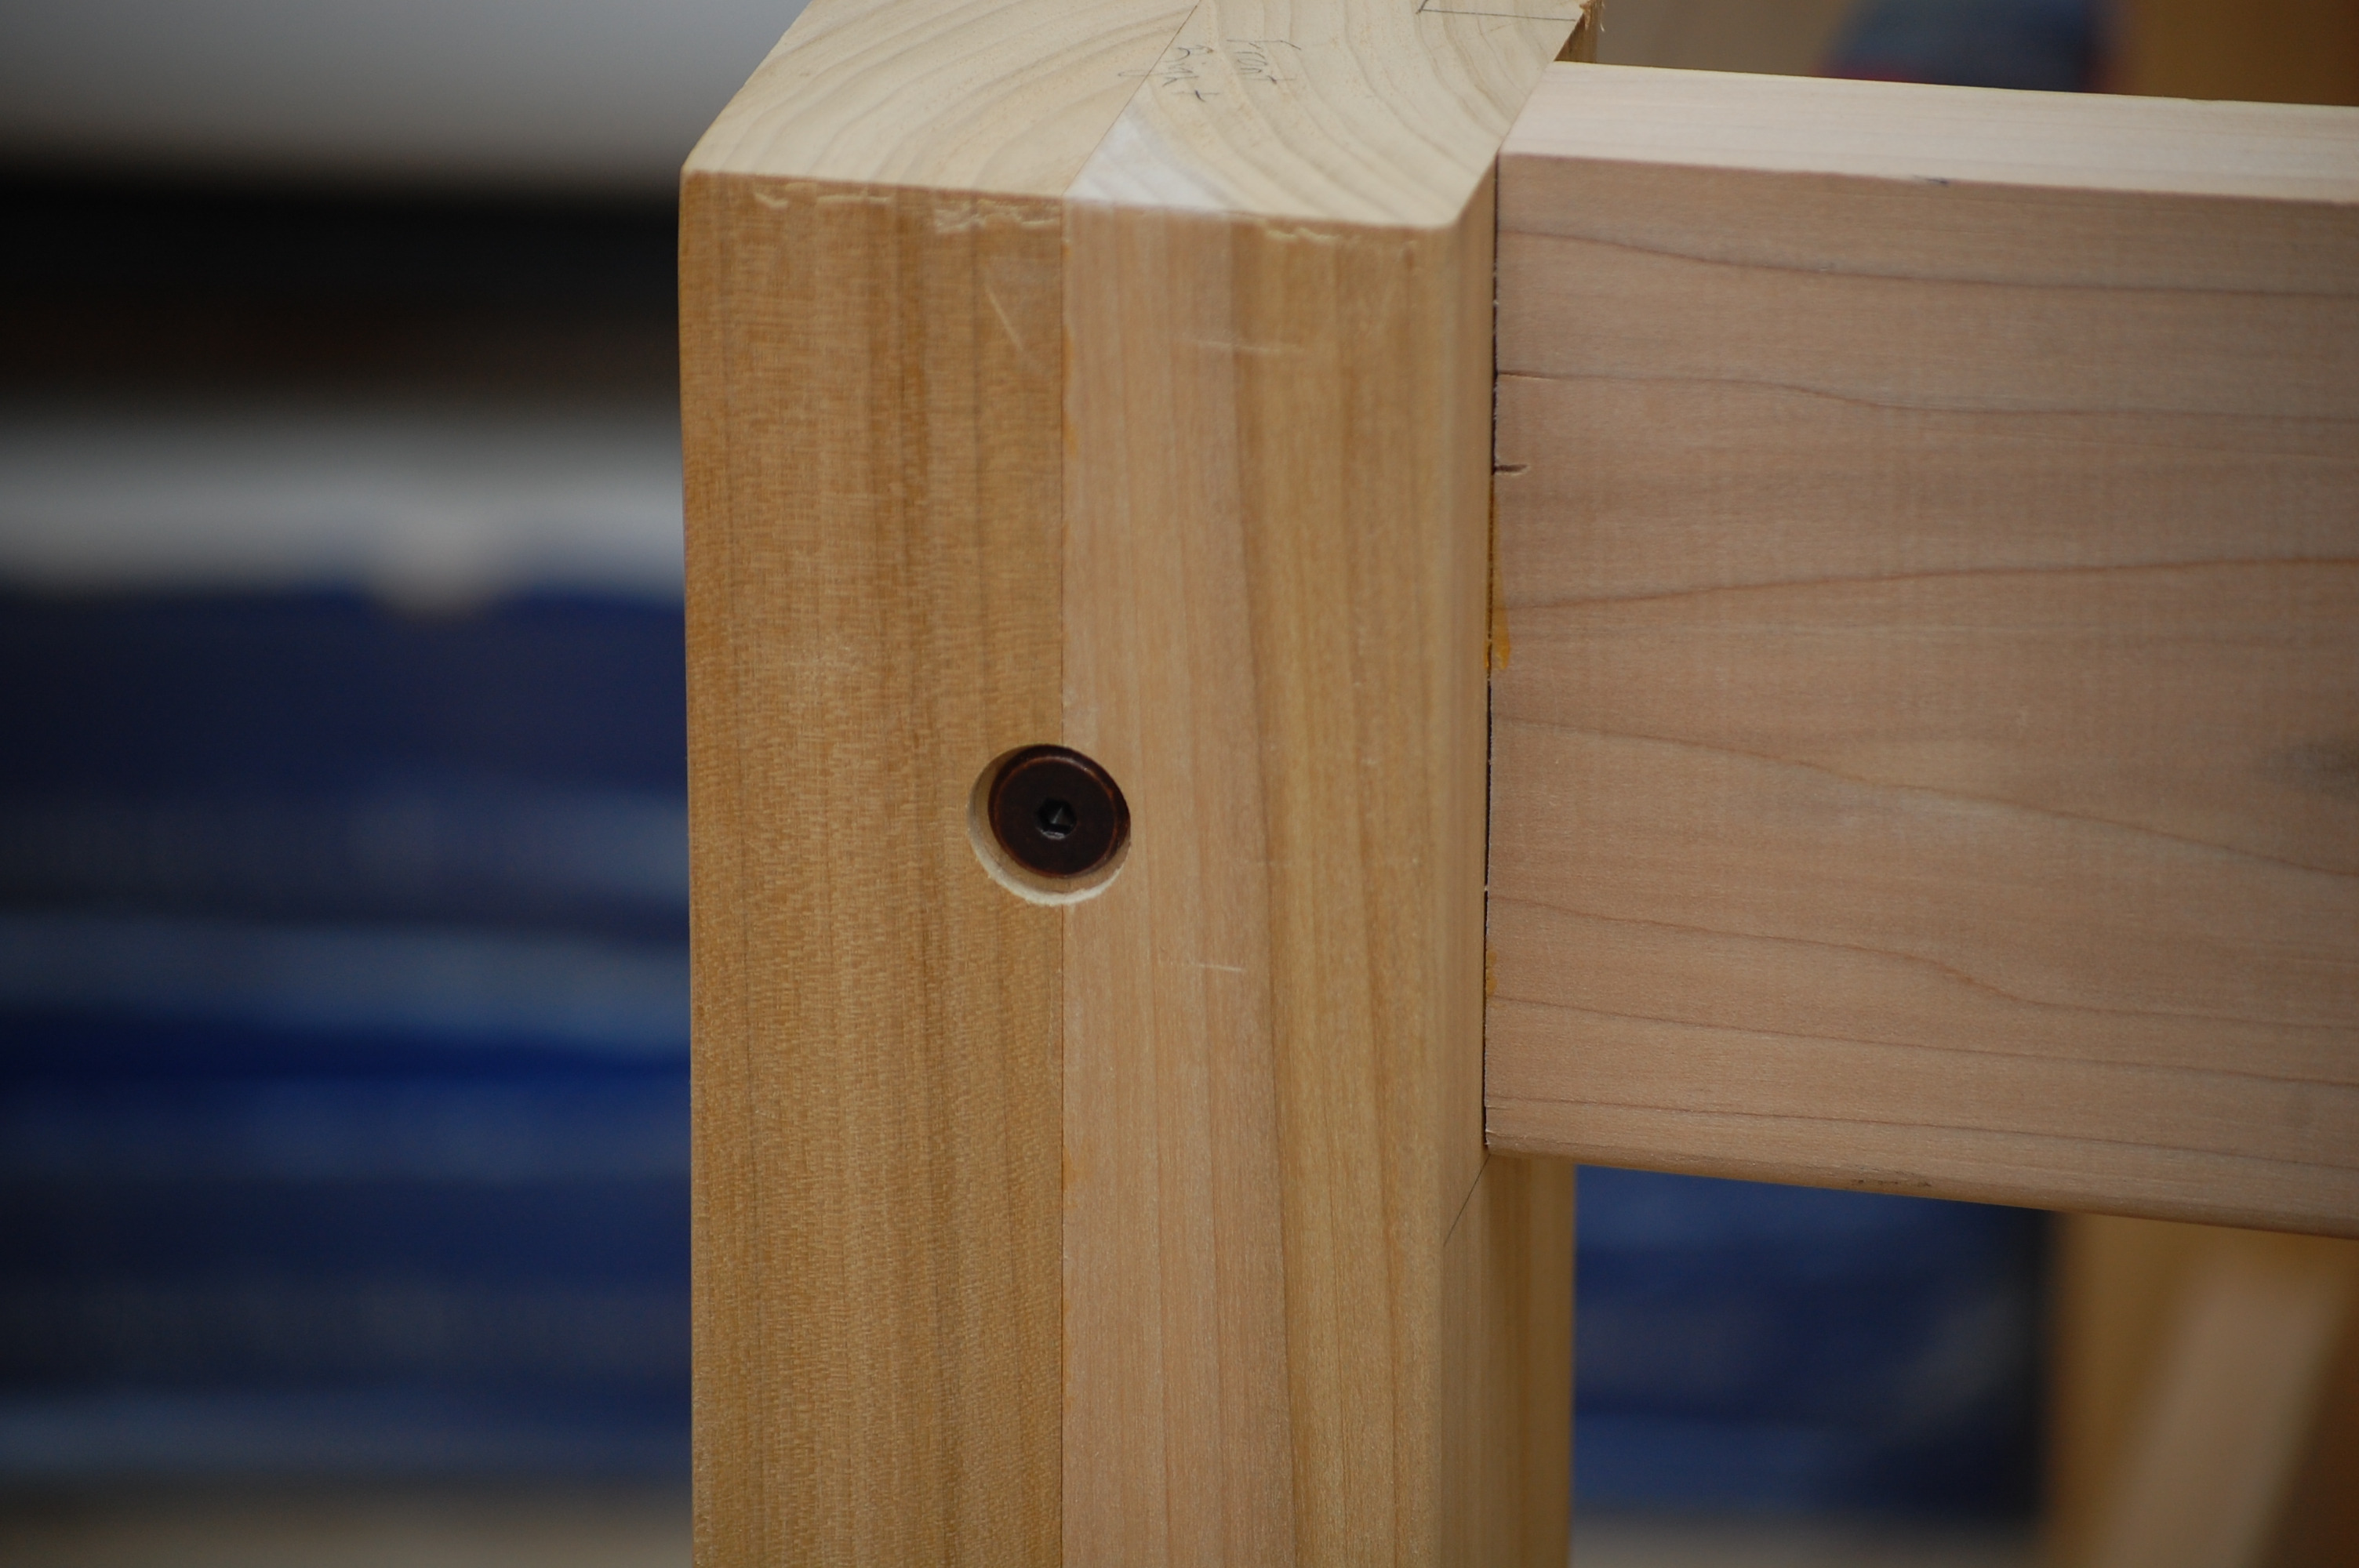
Even though I won’t be moving the bench often once it is complete, I still want to be able to break it down for easier transport. The base will be made up of two end assemblies with knock down stretchers along the length of the bench. Each of the end assemblies will consist of two legs and an upper and lower stretcher, joined by through mortise and tenon. Here I’m laying out the locations of the stretchers on the legs and marking the length of the tenons.


The through mortises are made first on the drill press to hog out most of the material, then using chisels to square them up.


The tenons are cut on the tablesaw – no jigs, no sleds, no dado stacks – I just use the miter gauge at 90 degrees to the blade and keep nibbling away at the waste until a tenon is left.  The top stretcher’s tenons are offset to align the top of the stretcher with the top of the legs and keep the mortise wall above the tenon from getting too fragile.  Here is one set of legs and stretchers with the joinery cut:

I mark each piece with indications of orientation and each component of a joint with matching marks just to ensure that I can remember how to assemble everything.


A dry-fit of one leg assembly:


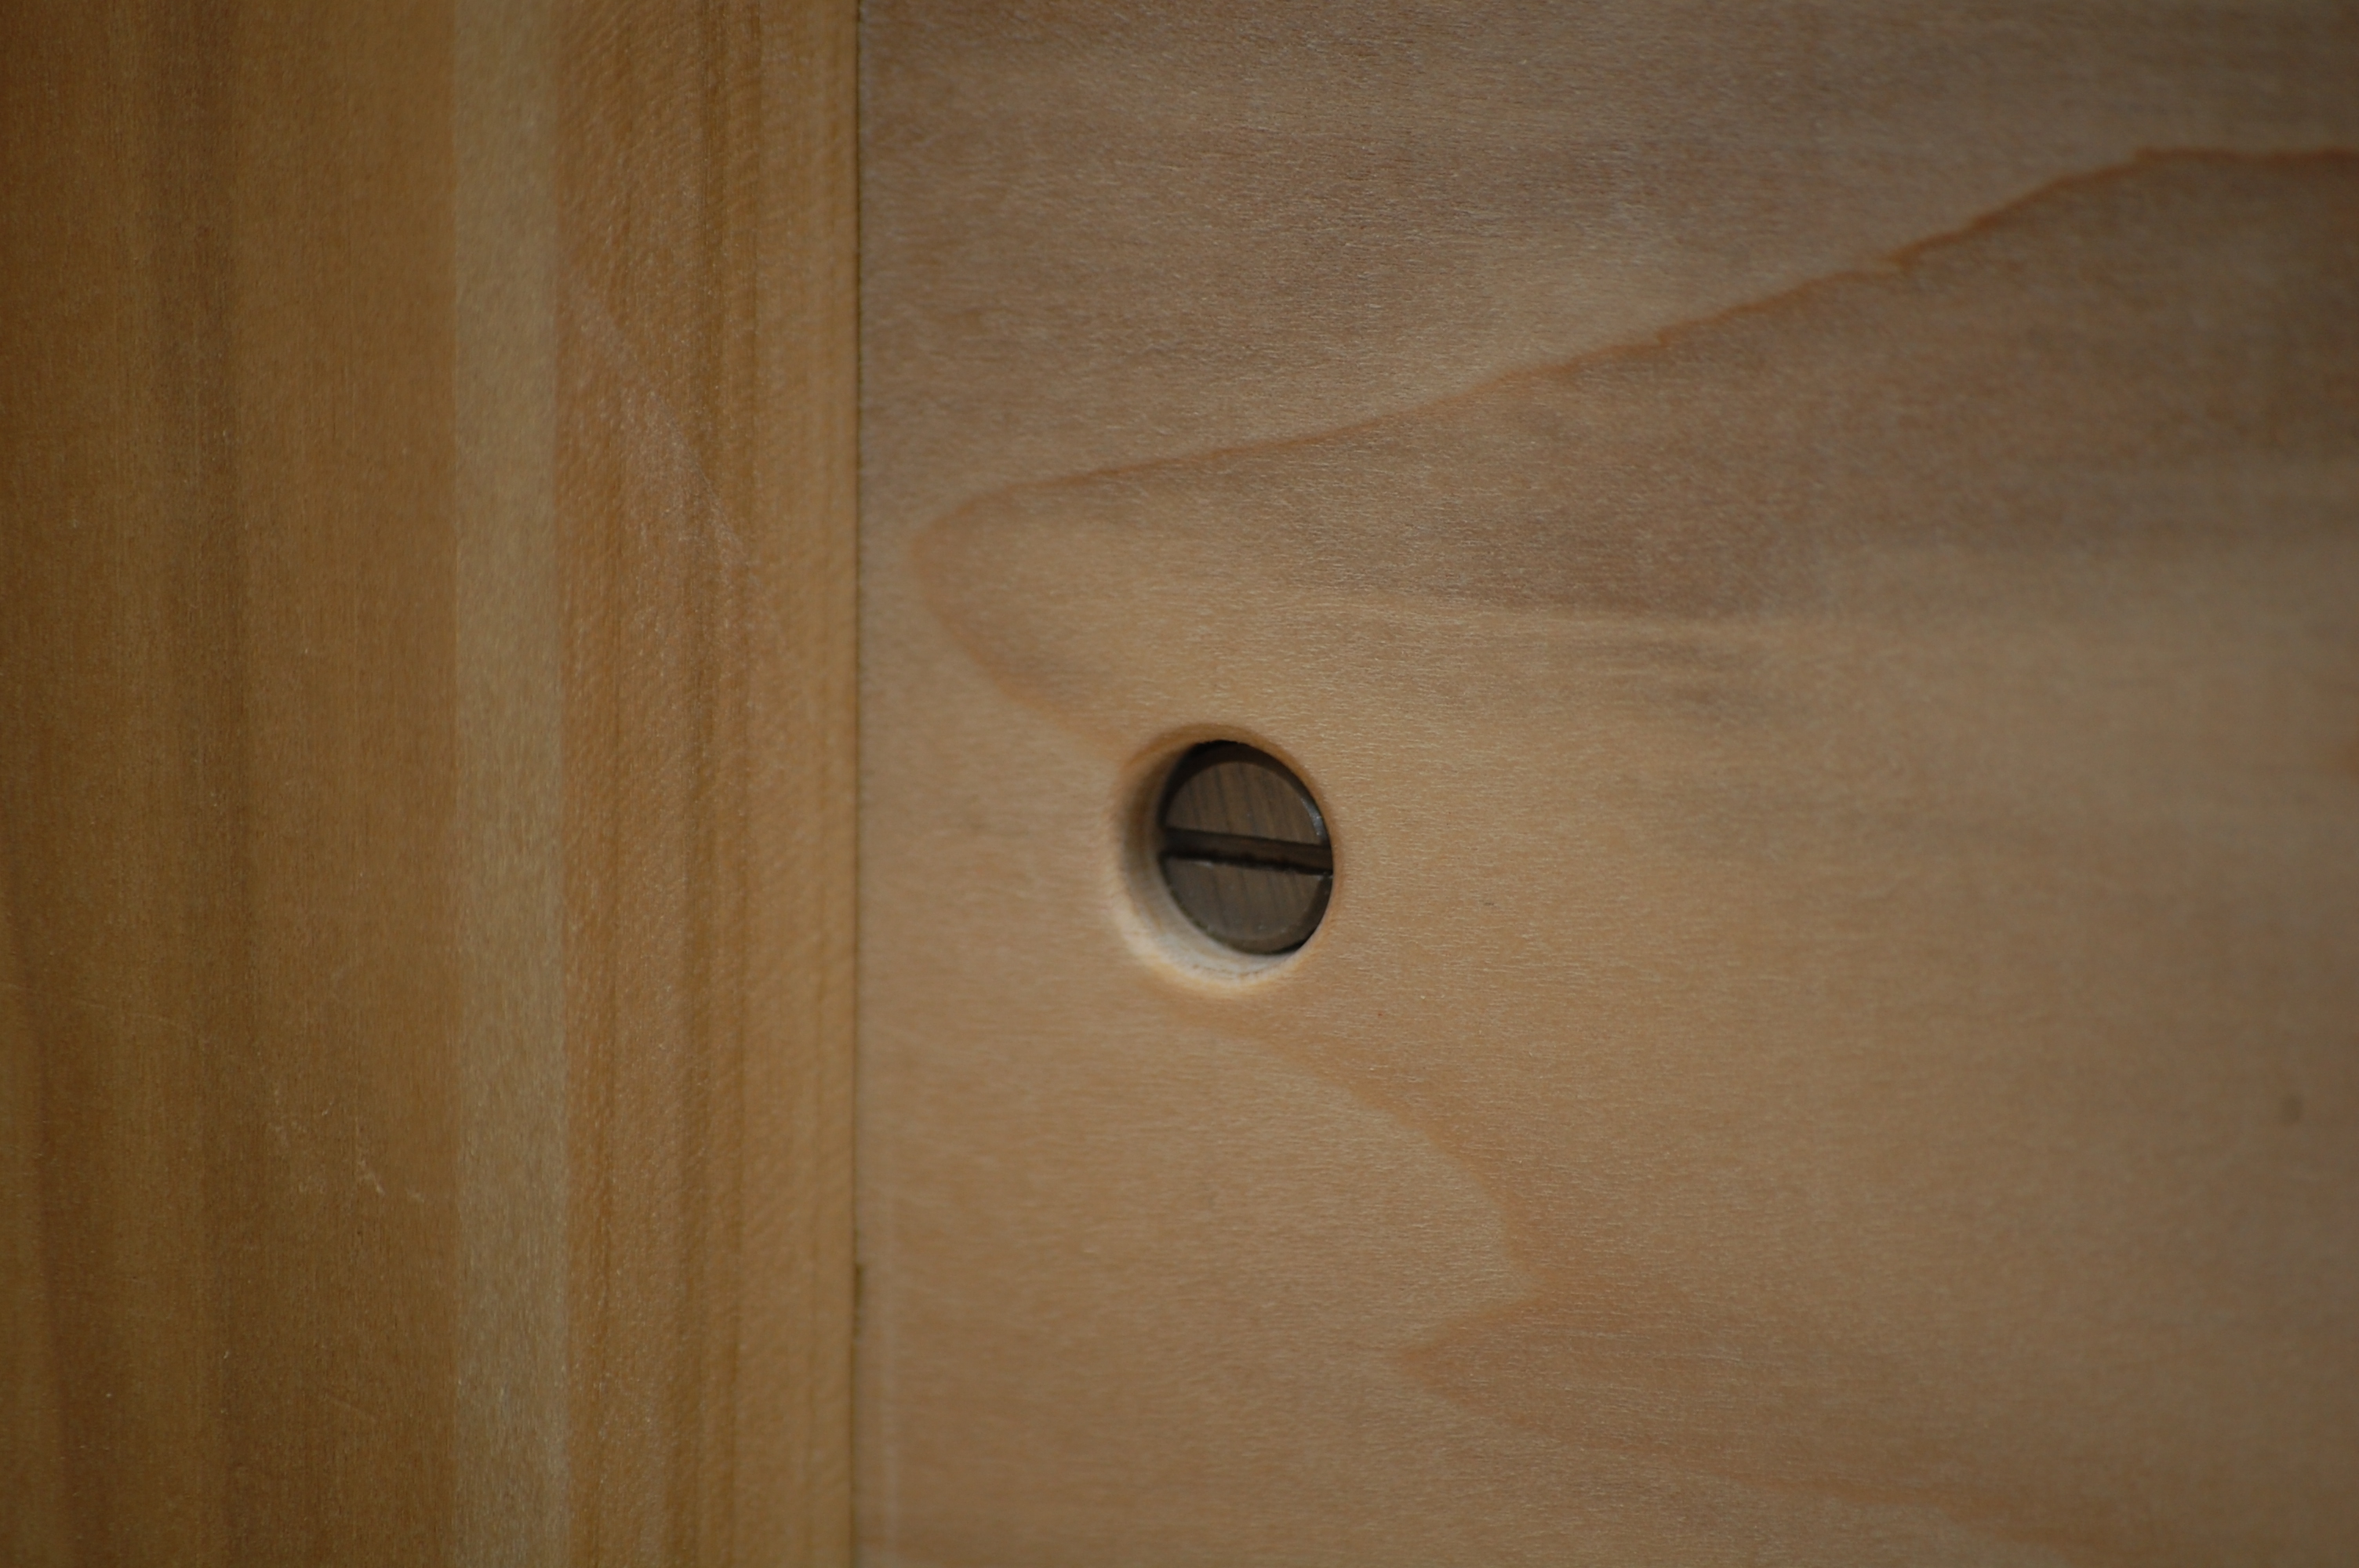
I plan to wedge these tenons during final assembly to help ensure a snug fit and add a decorative touch.

I still have to layout and cut some of the joinery for the knock-down stretchers and leg levelers before I can glue up the leg assemblies.  More on that to come…

Workbench #2 – Bench Top

I have now completed the benchtop. Two key parts dictated dimensions and part locations: the countertop that I picked up from Ikea, and the large front vise from Lee Valley.

Here is the countertop – solid beech:

Beech Countertop from Ikea

There was a small gap on the underside of the countertop that I filled with epoxy:

Two pieces of MDF were cut to the same dimension as the countertop. On the underside of one piece of MDF, I layed out where the vise would be along with the legs and apron, then determined where I would want dog holes. Once all of those locations were determined, I laid out a grid for attaching screws.

Next, I aligned the two pieces of MDF and the countertop and put a cabinet maker’s triangle on each edge:

I pre-drilled and countersunk some of the screw location holes in the MDF, laminated them together and used screws as clamps. Then, I aligned the MDF lamination with the countertop and drilled pilot holes for the larger screws to attach the MDF to the countertop. Removing the MDF from the countertop, I widened the pilot holes to clearance holes in the MDF and countersunk the holes. To account for any movement in the solid beech top, I slightly widened the clearance holes moving out from the lengthwise mid-line in the MDF. Aligning everything together once more, I sunk in the screws to attach the MDF and countertop together (no glue).


To give the edges a clean look, I added a beech surround to the benchtop, gluing the long edges (beech to beech—no glue on the MDF) and bolting on the short sides. The gluing proved to be interesting as I only have two bar clamps and they aren’t quite long enough to span the width of the benchtop. I clamped on some scraps near the ends to help align the edging with the top of the bench and made some quick clamp extenders:


For the short edges, I once again sunk the center bolt straight in, but elongated the holes into slots for the outer bolts to allow for any seasonal expansion:

Here is the wood for the base:

Next up – cutting the legs. Here is the leg stock:

Workbench #1 – Intro

I’ve decided that I really need a workbench if I’m going to be doing any amount of ‘real’ woodworking. A board slapped on top of the tablesaw isn’t really cutting it, and I could really use a vise. I’ll be following the ‘Getting Started in Woodworking’ workbench design loosely with many of my own modifications. Much of the design will come out of the components that I have selected for the bench. First, I want a solid wood top rather than MDF, but I don’t want to do the lamination and flattening myself. I found a beech laminated counter-top at Ikea for $39. Sized at 25 5/8” by 49 5/8”, I thought that this would make a good size starter workbench. Other items of interest that will affect design choices: Bench should be usable as an out-feed table for the tablesaw Bench should be heavy, but able to be moved Will use the large vise from Lee Valley Desire to be able to level the legs of the workbench on an uneven floor I don’t have access to any of my photos at this time, but will post some with the next entry.